


2nd Grade Resources and Activities
 Launch the media gallery 1 player
Good afternoon 2nd graders! As I write this letter it has now been 1 week since we were together at school. I miss you all very much! I am anxious to get back to school to see each of you! I know some of you are probably sick of those packets! I know that is not what we thrive on but until we get back to school they were a simple way to provide you with some work to do so you could continue to learn. I thought it would be a great idea to send you a few new ideas of ways you can keep your brains active! I will include some fun things, some cool websites and a few challenges.
Fun activities:
Make play dough
HOW TO MAKE PLAYDOUGH
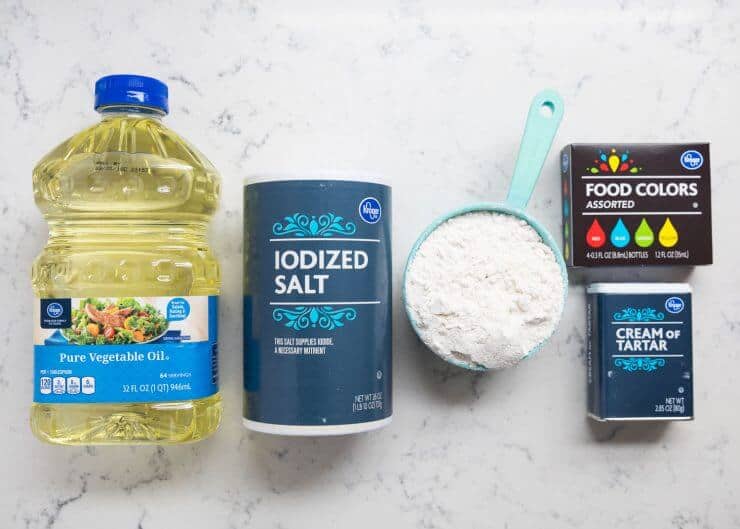
Playdough ingredients:
- 2 cups all-purpose flour
- 3/4 cup salt
- 4 teaspoons cream of tartar
- 2 cups lukewarm water
- 2 Tablespoons of vegetable oil (coconut oil works too)
- Food coloring, optional
- Quart sized bags
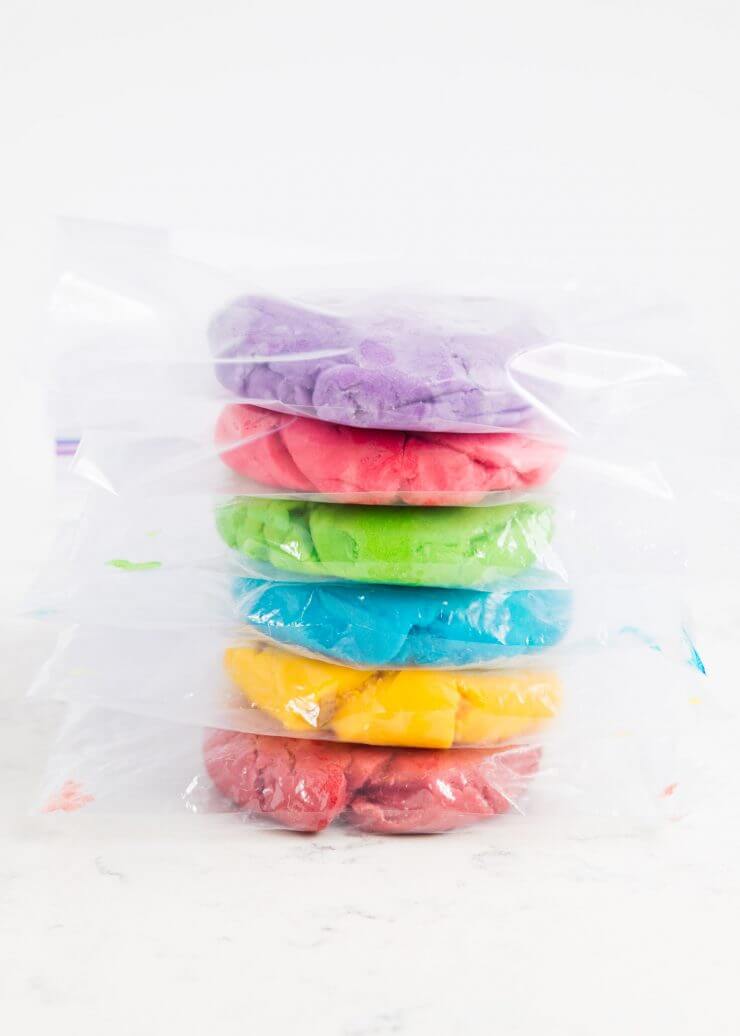
Stir together the flour, salt and cream of tartar in a large pot. Next add the water and oil. If you’re only making one color, add in the the color now as well. Cook over medium heat, stirring constantly. Continue stirring until the dough has thickened and begins to form into a ball. Remove from heat and then place inside a gallon sized bag or onto wax paper. Allow to cool slightly and then knead until smooth. If you’re adding colors after, divide the dough into balls (for how many colors you want) and then add the dough into the quart sized bags. Start with about 5 drops of color and add more to brighten it. Knead the dough, while inside the bag so it doesn’t stain your hands. Once it’s all mixed together you’re ready to PLAY.
Store the play dough inside the bags once done to keep soft. Keeps for up to 3 months.
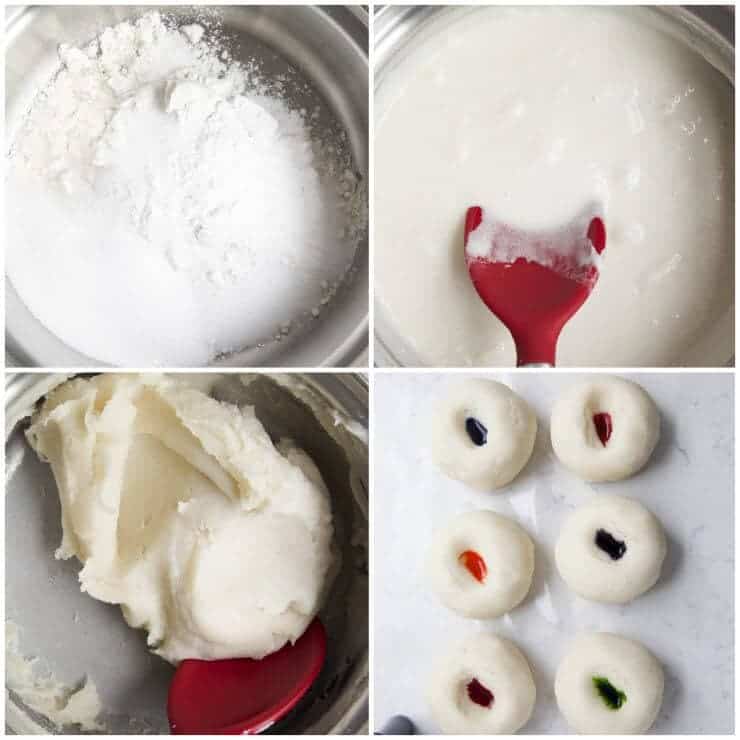
Once the dough is finished, I like to put each dough ball into it’s own quart sized zip top bag. Then I let my kids squish the colors together. It gives the kids something to do, makes it so your hands aren’t stained and then gives the dough a home after. We use the same bag to store the dough when the kids are done playing with it. If you only plan on making ONE color, just add the food coloring into the pan when you add the water (makes it easier to mix it in). My kids can never decide on just one color, so we usually need to divide it out.
Make Crystals (see MO 4H Facebook page for a live video)
Ingredients
- 2 cups water
- 4 cups granulated sugar
- Optional: 1/2 to 1 teaspoon flavoring extract or oil
- Optional: 2 drops food coloring
Steps to Make It
Note: while there are multiple steps to this recipe, this homemade rock candy is broken down into workable categories to help you better plan for preparation.
Prepare Your Materials
-
Clean the glass jars thoroughly with hot water.
-
For each jar, cut a length of a thick cotton thread a few inches longer than the height of the jar, and tape it to a pencil. Place the pencil across the lip of the jar, and wind it until the thread is hanging about 1 inch from the bottom of the jar. Attaching a paper clip to the bottom of the thread will weigh it down and help it hang straight.
-
As an alternative, you can use a wooden skewer instead of the string. Use clothespins balanced across the top of the jar to clip it into place.
Make Your Rock Candy
-
Gather the ingredients.
-
Wet each thread or wooden skewer with water, and roll it in granulated sugar. This base layer gives the sugar crystals something to grab when they start forming. Set these aside to dry while you prepare the sugar syrup.
-
Place the water in a medium-sized pan and bring it to a boil. Begin adding the sugar, one cup at a time, stirring after each addition. You will notice that it takes longer for the sugar to dissolve after each cup you add. Continue to stir and boil the syrup until all of the sugar has been added and it is completely dissolved. Remove the pan from the heat.
-
If you are using colors or flavorings, add them at this point. When using an extract, add 1 teaspoon of extract; for flavoring oils, only add 1/2 teaspoon. Make sure you don’t stand right in front of the pan because the scent can be very strong as it rises in the steam. Add 2 to 3 drops of food coloring and stir it in to ensure an even, smooth color.
-
Allow the sugar syrup to cool for approximately 10 minutes, then pour it into the prepared jars. Lower one sugared string or skewer into each jar until it hangs about 1 inch from the bottom.
-
Carefully place your jar in a cool place, away from harsh lights, where it can sit undisturbed. Cover the top loosely with plastic wrap or a paper towel.
-
You should start to see sugar crystals forming within 2 to 4 hours. If you see no change after 24 hours, try boiling the sugar syrup again and dissolve another cup of sugar into it. Then pour it back into the jar and insert the string or skewer again.
-
Allow the rock candy to grow until it is the size you want. Don’t let it grow too large, otherwise, it might start growing into the sides of your jar! Once it has reached the desired size, remove it and allow it to dry for a few minutes, then enjoy or wrap in plastic wrap to save for later.
-
Serve and enjoy!
Mix Colors- www.incrediblescience.com
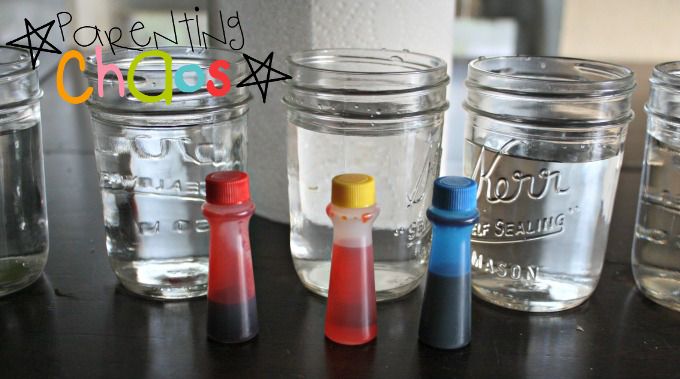
Items Needed for Crawling Colors! Color Mixing Science Experiment:
- 5 Clear Containers
- Primary Color Food Dye (Red, Yellow, Blue) or Washable Watercolors
- Paper Towels
- Water
How to Set Up Crawling Colors:
There are two ways that this can be done. You can fill up the cups for red, yellow, and blue…and wait a very very long time for the colors to travel and drip down into the new glass…
OR you can fill up all five cups with water and save some time. The cups that are going to have orange and green in them need to have less water than the three that will hold the primary colors.
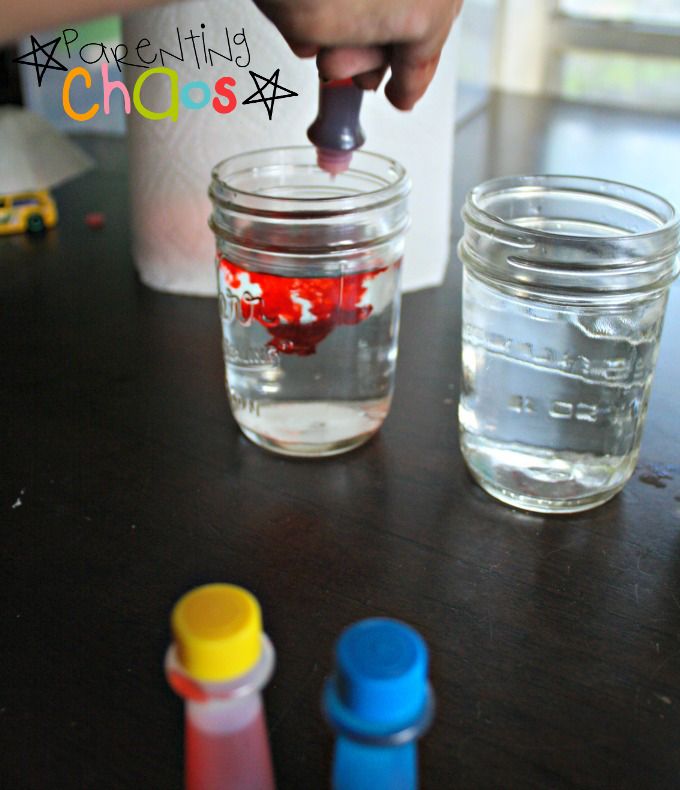
Add in as many drops of red food dye as your child desires!
Squeeze in the Yellow!

Drop in some blue!
Adding in the food dye is a huge part of the fun for this science experiment so don’t be afraid to hand the bottle over and let your kid at it. As an added bonus the squeezing is awesome for strengthening those fine motor skills! If you are worried about the food dye staining {and YES it most definitely will with this activity} substitute the food dye for a washable water color.
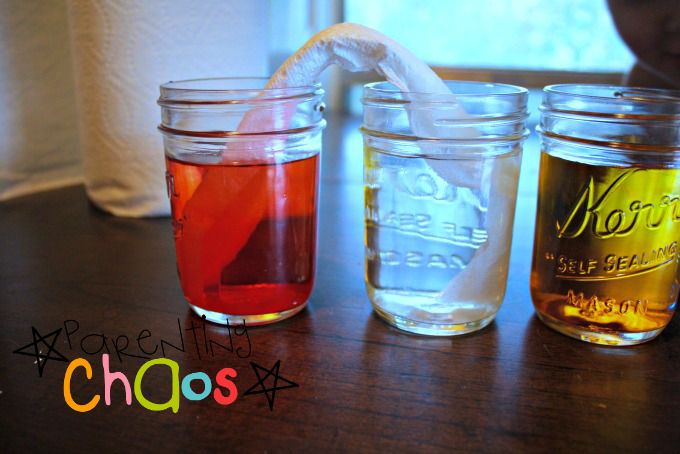
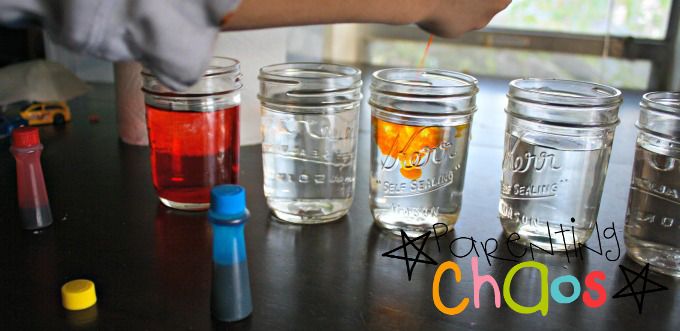
Once all your primary colors are added, it is time to set up the towels for the colors to crawl across! To do this you will roll up a paper towel and take an edge to go into each cup (one primary and one empty/clear).
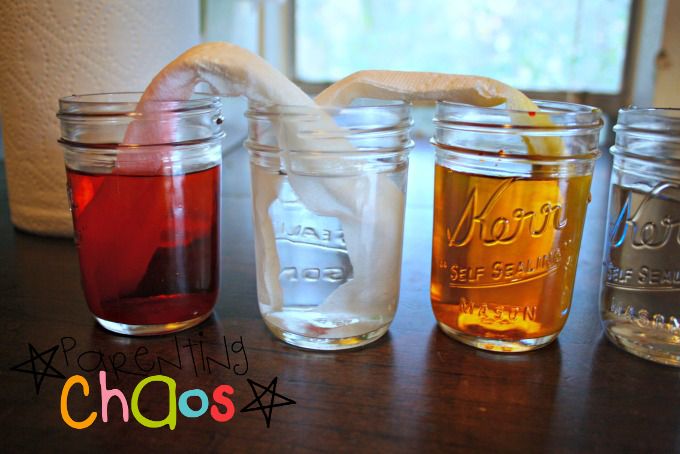
Keep adding in paper towels between the cups until you have made a crawling caterpillar.
The “finished” product should look like this.
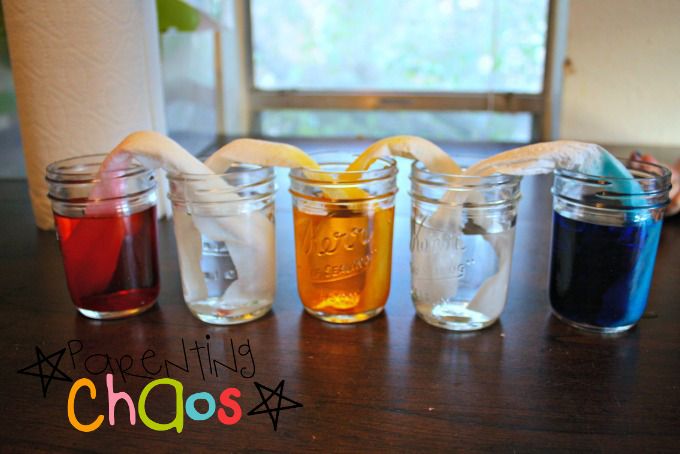
Watch the Colors Crawl!
Leave the jars to sit and watch the colors crawl…or dig your fingers in and play in the water as the colors transfer!
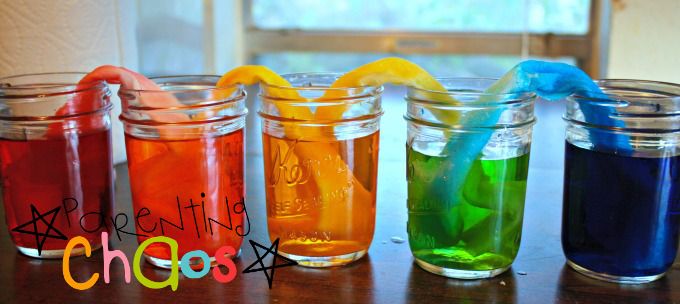
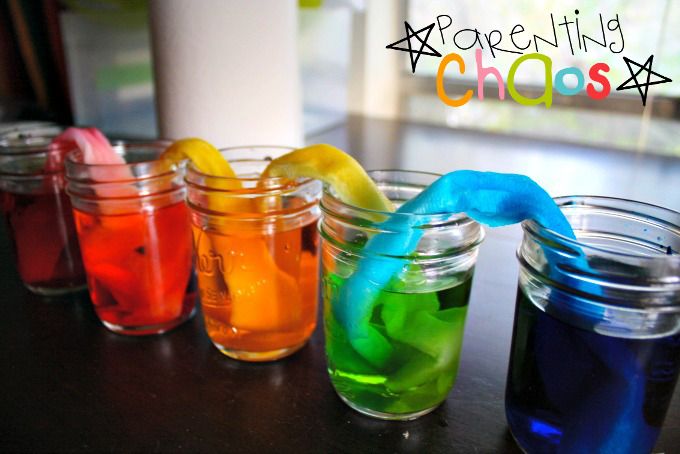
The end result is a gorgeously vibrant rainbow that your kiddos will be proud to have created!
Some great websites I have found are:
There are some awesome opportunities right now to hear authors read their own books and teach students to draw their characters! Check these out! Look for dates and times in the links!
Check this link for all authors: bit.ly/ReadAloudAtHome
Mo Willems (Author of Pigeon, and Elephant and Piggie Books) – https://www.kennedy-center.org/education/mo-willems/
Peter H. Reynolds (Author of The Dot) – www.facebook.com/PeterHReynolds
Ben Clanton (Author of Narwhal Books) – www.facebook.com/clantoons
James Dean (Author of Pete the Cat Books) – https://www.instagram.com/petethecatofficial/
Jarrett Krosoczka (Author of the Lunch Lady series) – youtube.com/studiojjk
Susan Verde (Author of I Am books) - https://www.instagram.com/susanverde
Mac Barnett - https://www.instagram.com/macbarnett/
Tara Lazar – https://www.youtube.com/channel/UC_e9wBEdWSZBf7xaJadl7dg
The challenges I have for you are:
Challenge #1
Create a Reading Fort
Step 1: With your parents find a place where you can construct your fort.
Step 2: Gather items you will need. You may use any items your parents approve but here are some suggestions:
blankets
pillows
large sheet
chairs
heavy books or something to weight your sheet
favorite books to read
Step 3: Construct your reading fort. Be as creative or as simple as you like. There is no such thing as a "bad" reading fort!
Step 4: Crawl into your fort and enjoy your books! Don't forget to invite your parents or siblings.
Step 5: Have your parents take a picture of you in your fort! I would love to see you in your fort!
Challenge #2:
Create a Clock. Construct this clock and have someone quiz you on time.

Challenge #3- Write a Friendly Letter to a friend or relative. Be sure to include all of the parts of a letter!

I will continue to find fun and creative ways for you to learn and post on the school website.
Please check back frequently. You are welcome to email me at any time. My email address is: jtrimble@putnamcountyr1.net
See you soon 2nd Grade!
Mrs. Trimble